Wednesday, December 16, 2020

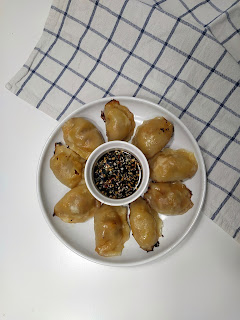
Kitajski pečeni cmočki / Potsticker dumplings

Scroll down for English version! 

Teli cmočki so bili zelo dolgo na mojem kuharske seznamu, ampak nikoli niso ugledali luči dneva. Če sem čisto iskrena, smo jih z družino vedno naročali v Kitajski restavraciji in se kregali, kdo dobi zadnjega. Zdelo se mi je, da se ne bom mogla niti približati okusu, ki ga dobiš v restavraciji in da je potemtakem ta recept že vnaprej obsojen na propad.

O, kako sem se motila!

Ne samo, da priprava ni bila tako zakomplicirana kot se mi je zdelo na začetku, ampak so cmočki celotno stanovanje napolnili z omamnim vonjem. Še zdaj, ko pišem o tem, se mi cedijo sline.

Za izhodišče sem vzela recept na Youtube kanalu Jamie Oliverja, kjer pripravo demonstrirata tako imenovani Dumpling Sisters (prevod: Cmoček sestri?). Vendar pa je čar cmočkov ravno v tem, da lahko nadev pripraviš čisto po svojih željah in to sem tudi storila.

Za testo:

³  300g univerzalne moke

³  220ml vrele vode 

Postopek za pripravo testa se je meni, ki nisem ravno ekspert, zdel enostaven. Moko in vodo sem preprosto zmešala v kuhinjskem robotu. Ko se je testo dovolj ohladilo (zaradi vrele vode je na začetku zelo zelo vroče) sem testo dokončno zgnetla še na roke, da dobiš res gladko maso. Nato pa je testo počivalo kakšno uro – priznam, da ne vem koliko točno, ker smo vmes gledali božični film. Važno je, da je testo ves čas pokrito, da ne izgubi vlage.

Za nadev:

³  400g mletega mesa

³  Čebula

³  Sezamovo olje

³  Soda bikarbona

³  Sladkor

³  Temna in svetla sojina omaka

³  Poper

Čebulo sem nasekljala na majhne koščke, ampak res na majhne, ker sem se bala, da bi se preveč čutila v nadevu. Nato pa sem vse sestavine samo združila v večji posodi in dobro premešala. Rekla bi, da sem vsake sestavine (sojina omaka, sezamovo olje, soda bikarbona, sladkor, poper) dodala približno žlico, tako da je pokrila vso meso, hkrati pa ni nobena stvar prevladala nad drugo.

Nato pa pride na vrsto razdelitev testa in valjanje. Meni je metoda prikazana v videu povsem uspela, tako da res priporočam, da si za postopek oblikovanja testa pogledate video (med 2:39 in 4:00).

Nato pa nam ostane samo še peka oz. kuhanje. Na ponvi segrejemo žlico olja, tako da se nam cmočki ne bodo prijemali. Cmočke zložimo v ponev in pečemo približno 2 minuti. Svetujem, da enega dvignete med pečenjem in pogledate, če se je naredila zlata skorjica. Ko zagledate skorjico, je čas, da cmočke zalijete s 100ml vode in pokrijete ponev. Ko voda izpari, so cmočki kuhani.

Dober tek!

Potsticker dumplings

Dumplings were on my cooking list for so long, but they never saw the light of day. If I’m being honest, my family and I always fought over the last dumpling in a Chinese restaurant. How could I make anything that would taste as good as those dumplings in a restaurant? I assumed that making them at home was destined to fail.

O, how wrong I was!

The preparation isn’t as hard as I assumed from the beginning. And after I was done making them the whole apartment was filled with this rich, amazing smell. Even now, just writing about this, is making me salivate.  

I decided to follow a recipe posted on Jamie Oliver’s Youtube account where the Dumpling Sisters demonstrate the preparation. However, the best thing about dumplings is that you can tailor the filling to your wishes. That’s exactly what I did.

For the dough:

³  300g all-purpose flour

³  220ml boiling water

I am no expert at making a dough, and even I thought it was fairly easy to make. I put the flour and boiling water into my Kitchen Aid. When the dough has cold down enough, I proceeded to knead it with my hands. When my dough became smooth, I covered it with plastic foil and let it rest while watching a Christmas movie. The key here is to not lose the moisture in the dough!

For the filling:

³  400g minced meat

³  Medium large onion

³  Sesame oil (tablespoon)

³  Baking soda (tablespoon)

³  Sugar (tablespoon)

³  Dark and light soy sauce (tablespoon each)

³  Pepper (tablespoon) 

I finely chopped the onion, really finely, because I was afraid it would be overpowering in the filling. In the bigger bowl I mixed all the ingredients together, and that was it for the filling.

Next you need to roll out the dough and fill the dumplings. I followed the instructions in the video (watch from 2:39 to 4:00) and it work wonderfully. I recommend that you follow them along!

All that’s left is cooking our homemade dumplings. Add a tablespoon of oil to a pan. Add the dumplings in the pain and wait until the golden crust forms on the. You should pick one up, to check for the crust on the bottom. When you see the crust has forms add 100ml of water to your pan and cover it with lid. Once the water has evaporated, your dumplings are done.

Bon Appétit!


Monday, December 14, 2020

Čokoladno-jagodna torta / Chocolate-strawberry cake

For the recipe in English scroll down

Kot prvo, tole ni najbolj 'simpl' torta. Ampak namen mojega bloga in Instagram računa je ravno to, da delam stvari za katere prej nisem imela poguma. Vedno sem si rekla, da bom najden recept enkrat naredila, potem pa je preprosto ostal shranjen in nikoli ni bil izveden. 

Pred kratkim sem dobila pekač s premerom 18cm, ki ga preprosto obožujem in ga po novem uporabljam za skoraj vsako torto. Na internetu obstaja super orodje, ki se imenuje torta pretvornik in ti izračuna sestavine za želeni premer pekača (https://midvakuhava.si/tortopretvornik/). 

No tole je preveden recept s povezavami do videov. 

Sestavine za biskvit:

³  202g jajc (to je cca 4 jajca)

³   144g sladkorja

³  14 g medu

³  Vaniljev ekstrakt 

³  115g gladke moke

³  14g kakava

³  36g masla

³  58g mleka

Biskvit sem pripravila po sledečem postopku:

https://www.youtube.com/watch?v=NwJlKhneQi0&t=363s

Naredimo parno kopel, kjer zmešamo jajca in sladkor. Mešanica se mora segreti toliko, da se sladkor raztopi. Dodamo še med in vaniljev ekstrakt (približno eno čajno žličko). Vse skupaj z električnim mešalnikom miksamo toliko časa, da se masa podvoji ali celo potroji. Izgledati mora podobno kot sneg iz beljakov, samo malo manj čvrsto.

V napihnjeno maso presejemo gladko moko in kakav ter vse skupaj počasi vmešamo s kuhalnico. Masa bo rahlo izgubila na volumnu zaradi moke, ampak to je normalno.

V posebni posodici segrejemo maslo in mleko. V posodico vmešamo nekaj mase, da maslo in mleko rahlo ohladimo, nato pa vse skupaj, torej maslo in mleko, dodamo k masi z moko.

Zlijemo v pekač, ki je obložen s peki papirjem in nekajkrat udarimo ob pult s pekačem, da se znebimo velikih mehurčkov, ki so nastali v biskvitu. Pečemo na 170 stopinjah približno 40 minut.

Sestavine za kremo (https://www.youtube.com/watch?v=o9yH65q1FUs&t=16s):

³  250ml sladke smetane

³  45g čokolade

³  Jagode

Sladko smetano in čokolado segrejemo, tako da se čokolade lepo raztopi. Damo ohladiti v hladilnik ali na balkon za uro in pol. Mešanica mora postati gosta. Ko se zgosti, jo zmiksamo, da dobimo čokoladno sladko smetano.

Biskvit razrežemo na pol. Prvo polovico namažemo s kremo in posujemo gor nasekljane jagode. Dodamo še malo kreme, da jagode prekrijemo. Položimo gor drugo polovico biskvita. Počakamo, da se tako sestavljena torta malo ohladi, da postane krema notri bolj trdna in nato še celo torto premažemo s kremo.


Chocolate-strawberry cake

Firstly, I’ll admit this might not be the easiest cake to make, however I’m trying to challenge myself every day (that's why I started my Instagram account). If you ask anyone that knows me well, they’ll tell you I watch cooking shows and recipes all the time. I’ve always saved them, but never actually took the time to make them. And I’ve decided that should change. 

For this cake I used a round mould in size 18cm which I got recently and absolutely adore. 

Ingredients for the sponge:

³  202g eggs

³  144g sugar

³  14g honey

³  Vanilla extract

³  115g cake flour

³  14g cocoa

³  36g butter

³  58g milk

For the sponge I used a following technique:  https://www.youtube.com/watch?v=NwJlKhneQi0&t=363s

Because the video has English subtitles I decided not to write it down as I did with the Slovenian version of this post. I think the video deserves the views, but if you’d like me to write down the recipes in the future, please let me know. 

Ingredients for the cream:

³  250ml of cream

³  45g chocolate

³  Strawberries

Melt the chocolate in the cream then put it the fridge or on the balcony (if you live in a colder country) for an hour and a half. The mixture should thicken a bit. When that happens, you can proceed to whipping the cream. And voilà, you made a chocolate whipped cream. I was following this video:  https://www.youtube.com/watch?v=o9yH65q1FUs&t=16s .

All that’s left for us to do is assemble the cake. Cut the sponge in half. Put chocolate cream on the first part and cover it with lots of cut up strawberries. Put a second part of a sponge on top and let it rest for a bit in a cold place, so that a cream has a chance to firm up. Than put your leftover cream from before all over the cake. Decorate as you wish!

Thursday, November 26, 2020

Redefining my blog – again.


This blog has grown with me throughout the years. And it’s time to change its course again.

For those of you who don’t know me, let me introduce myself once again. I’m Ana and I am currently 22 years old.  My passion is cooking and discovering new recipes which is also the reason I created my Instagram account called the.foodie.goodie. It’s also the reason I’m redefining my blog.

Although I love Instagram and the outreach it offers, I don’t think it’s meant for long, detailed descriptions of food.

So without further ado: This is now a food blog!

Sushi is one of my favourite things to make